Saturday, March 31, 2007


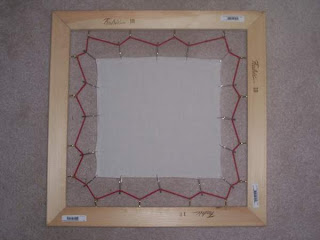
This is what it looks like with fabric stretched and pinned to the frame.

Making and using a stretcher frame


I created a frame using easy to find elements that required no special tools and would be easy to disassemble, reassemle and would be easy to adjust for different sizes of fabric.

What you need:
1: ready made stretcher strips found at Jo Ann Fabrics, Micheal's, etc. You can vary the size of your frame as long as the opposite two strips are the same size. These strips just fit together at the corners.

2: a box of cup hooks which can be found anywhere you buy neils and screws. These are nice because you can screw them in by hand very easily.

3: a large elastic band for hair. You will want the giant ones that are used as a headband, not a ponytail holder! Or, for a larger frame, you will have to find or make a longer elastic loop to make it around the inside of your frame.

4: safety pins to hold the fabric to the elastic.


How to stretch your fabric:
Cut your fabric about 2" smaller than the inside dimension of your frame. Put the pin through the middle of one side of your fabric piece and put the center side section of an elastic inside of the pin without pining through the elastic and then do the same for the opposite side. Next pin the top and bottom centers of your fabric. After all four sides are pinned from the center, do opposite corners and complete the pinning until all sections of elastic between the hooks are pinned to a corresponding section of the fabric.

This will hold your fabric tight and keep it off the table surface.

Working with Resist


Well, I've been working on 2 different pieces. One with gel glue resist and one with a maunfactured resist that was professionally made and packages. So far my results are very much the same. If I apply so much dye that the fabric is WET, or I wet the fabric before applying the dye, it bleeds to the neighboring section. If I apply dye with a brush and do not have a moisture saturated fabric, it works much better. Ive also found that when I use my heat gun to do a quick dry on the day sections it help prevent the bleeding of one section to another.

These are the two pieces I did. The "door" was done with gel glue and the feehand diamond grid was done with the color block resist I purchased. It's somewhat difficult to compair with the pictures simply because of the different techniques used so you'll have to just "trust me" with my observations of how the different formulas reacted during the dye application.
Thursday, March 29, 2007

Trying something new ...

When it comes to working with fabric, I am never unwilling to *try* things. I have many failures but it is only fabric, after all. So, when I got last this months issue of Quilting Arts magazine, I thought I really do need to try this resist process. They do it with silk, but I prefer to do my work in cotton.

I'm not sure it will be successful but I won't let that stop me. So yesterday I went to the art supply store and bought a few things I didn't already have and then, after work, I built my own stretcher frame for stretching the fabric tight for working on, some gel glue and some resist.

So far I've stretched a piece of muslin and have drawn my picture with gel glue, which I am using in place of regular resist. I read in a blog somewhere that you can substitute gel glue, so I'm trying that first. It will be interesting to see if there is a difference in result quality side by side.

I see a few areas where the gel glue is too thin, so i need to go back and reinforce my lines. The article warned about that, so it must be a technique thing, not a gel or resist thing. Maybe tomorrow night I'll have time to mix some dye and try my hand at this process.

I'll post my results when I complete this "experiment."

Tuesday, March 27, 2007

PIF (Paying It Forward)

Yea for me! Today I was blessed by PIF at my etsy shop so, in the spirit of PIF, I have added a PIF section to my store. I will place an item there at least once a week for the outrageous price of $0.20, which is the cost of listing my item with etsy. Etsy does not allow $0 items, so $0.20 is the general PIF price listing. Just remember, if you find a PIF at etsy.com and purchase it, you need to honor the PIF code of conduct and PIF!

Blessings!
Shelley Ann

"Nebula" - the begining of it all.


This is the piece that started it all. It didn't take a long time to do the fabric placement; the beading is what took my life over for DAYS! This piece is for sale at my etsy store.

Monday, March 26, 2007

A Splash of Sunshine Journal Cover


I added a new listing to my etsy shop. For people who like to journal in the traditional form. (Pen to paper.) It's such a beautiful day out that I HAD to make something cheerfully sunny.

Sunday, March 25, 2007

Tullamore Field


This is a picture of the largest piece I've done in this particular style. I've done 3 now. The larges is not necessarily the most difficult. I'll post that one at another time.

Back at it

Well, I'm back to blogging.

Such a touchy subject, you know. Using a public forum to display private thoughts. Okay, I'll keep my private thoughts private and only share what is uplifting and kind. (I really am a softy. I just have one thing in my life that's tempts me to be "brutally honest" with emphasis placed on the brutal part.)